Create Personal Access Token
Lyra, Gadi and Setonix (Nextflow Tower)
You need the authentication token to run Tower Agent (Gadi, Setonix) and monitor the pipeline to Nextflow Tower (Gadi, Setonix and Lyra). The authentication token can be created in Your tokens section of your profile in Nextflow Tower.

More information on the authentication can be found in the Nextflow Tower documentation: Authentication (Seqera) and Create Personal Token (Australian BioCommons).
Add Credentials for Tower Agent
Gadi and Setonix (Nextflow Tower)
Tower Agent needs to be run continuously to pick up jobs from Nextflow Tower, execute them on the HPC, and display the output log live and reports after completion. To run Tower Agent on HPC, you first need to create credentials for the Tower Agent. They will be used to launch it together with the Personal Access Token you created in the previous step.
If you are part of an organisational workspace, someone might have already created Tower Agent credentials and enabled the sharing of the agent. If that is not the case, you will need to create the credentials yourself. Either way, go to the Credentials tab in your organisation’s workspace, check if Tower Agent credentials exist already, and if not, click Add Credentials.

You can also create credentials to work in your personal workspace.
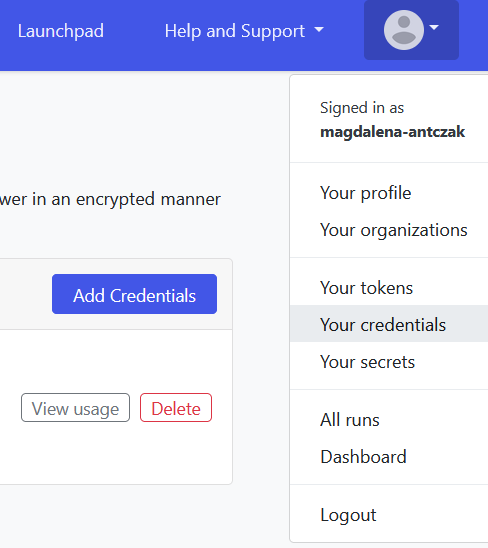
More information on adding the credentials can be found in Nextflow Tower documentation from Australian BioCommons: Create Tower Agent credentials.
Lyra
You are only allowed to monitor jobs using Nextflow Tower on Lyra, which does not require running the Tower Agent.
Add Personal Access Token in GitHub
Gadi and Setonix (Nextflow Tower)
GitHub is very restrictive about the number of times you can make API requests (it happens when you execute a pipeline in Nextflow Tower directly from GitHub repository). You can increase that number when a personal access token is used - we recommend creating one and adding it to the credentials (below). Instructions on how to generate the authentication token can be found in the GitHub documentation: Managing your personal access tokens.
Add Credentials for GitHub
Gadi and Setonix (Nextflow Tower)
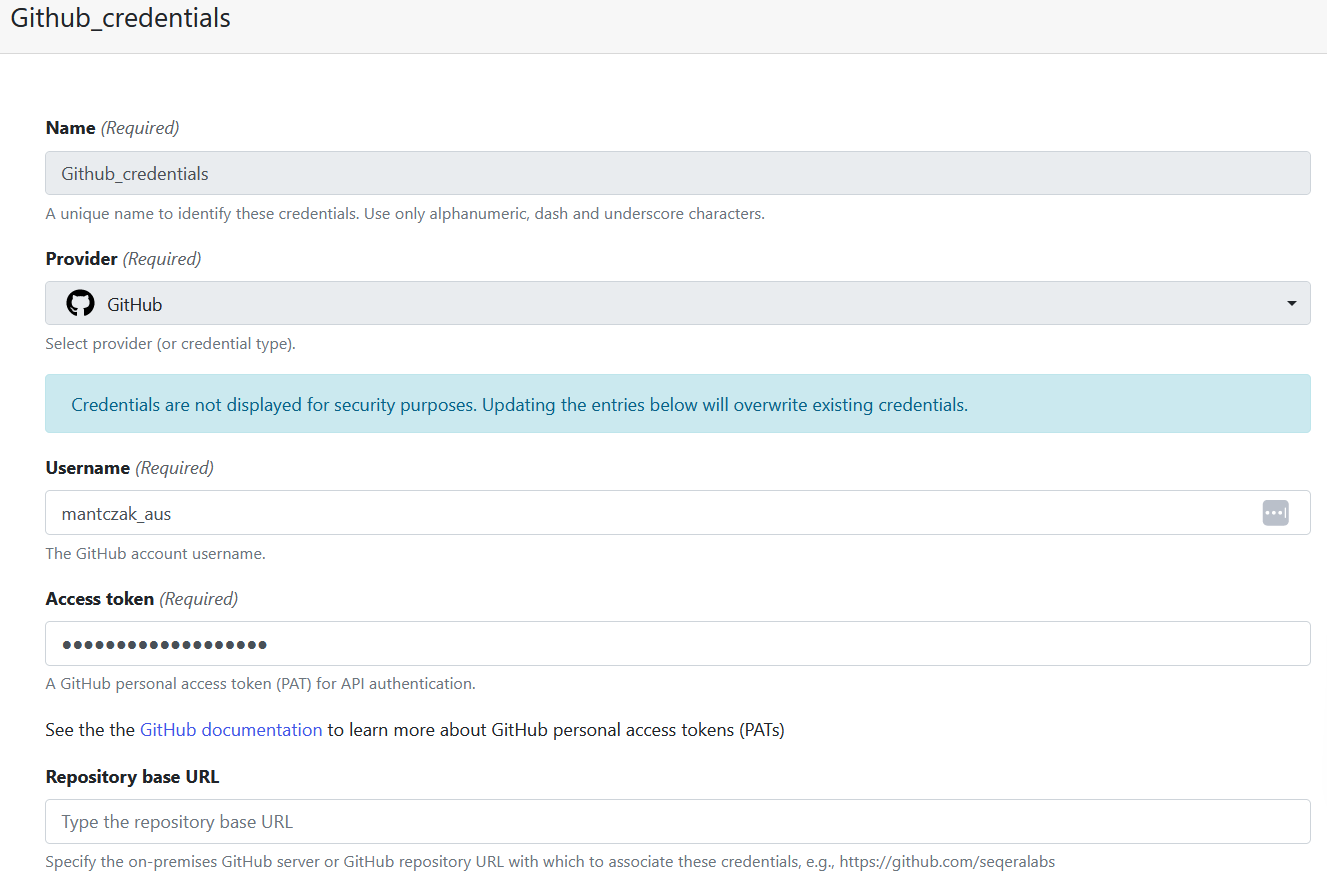
Credentials for GitHub are created similarly to credentials for Tower Agent – you also have the option to add them at the organisation or personal level, and you need to navigate to the Credentials tab. However, instead of choosing Tower Agent as a Provider, you will need to choose GitHub. Fill in the rest according to the help text provided under each field.
Install Nextflow and add default configuration
Gadi
Nextflow is available as one of the modules on Gadi, so installation is unnecessary. Any required configuration will be provided through the Compute Environment in Nextflow Tower.
Setonix
Nextflow is available as one of the modules on Setonix, so installation is unnecessary. Any required configuration will be provided through the Compute Environment in Nextflow Tower.
Lyra (HPC)
Follow the following steps in the NextFlow quick start guide created by the QUT’s eResearch Office:
- Installing Nextflow
- Nextflow’s Default Configuration
In this step, you must also add a configuration to monitor the pipeline’s execution in Nextflow Tower. Paste the following code:tower { accessToken = <YOUR PERSONAL ACCESS TOKEN> endpoint = 'https://tower.services.biocommons.org.au/api' workspaceId = <YOUR WORKSPACE ID> enabled = true }after
[[ -d $HOME/.nextflow ]] || mkdir -p $HOME/.nextflow
cat <<EOF > $HOME/.nextflow/config
workspaceId can be taken from Your organizations section of your profile in Nextflow Tower.Launch Tower Agent
You need to launch Tower Agent before you add a Compute Environment, as well as to add or execute a pipeline. Even if you use Nextflow Tower on Setonix or Gadi, this step needs to be done on HPC directly. Luckily, the instructions on how to launch the Tower Agent are provided to you when you create the Tower Agent credentials. The section Usage includes a command that you need to copy, modify with your security access token and execute on the HPC. Tower Agent will populate files in the work directory, so create it before executing the command from the Usage section. The Tower Agent will stop running when you close the ssh session. Thus, it is recommended to use a terminal multiplexer like tmux or submit a job with the running agent to the scheduler (more information in the Quickstart section of the Tower Agent help page provided by Seqera). Below are the tips and recommendations for running the Tower Agent on Gadi and Setonix.
Gadi (HPC)
Start a persistent session
persistent-sessions start -p <project-id> <session-name>
ssh to the given address, e.g.
ssh <session-name>.<user-name>.<project-id>.ps.gadi.nci.org.au
Start a tmux session and then launch the Tower Agent by using the command provided to you when you created the Tower Agent credentials.
Setonix (HPC)
Neither tmux nor screen is available on Setonix, so submitting a job to Slurm is recommended to keep the Tower Agent running for a certain period. The following command creates a Slurm script with directives required to run Tower Agent on Setonix. Copy the following command, replace the instructions provided to you when you created the Tower Agent credentials, and then execute the command in your terminal.
cat <<EOF > run_toweragent.sh
#!/bin/bash -l
#SBATCH --job-name=tw-agent
#SBATCH --mem=12gb
#SBATCH --time=24:00:00
#SBATCH --cpus-per-task=2
#SBATCH --partition=work
#SBATCH --ntasks=1
#SBATCH --ntasks-per-node=1

cd ~
<INSTRUCTIONS PROVIDED TO YOU WHEN YOU CREATED THE TOWER AGENT CREDENTIALS>
EOF
Once the run_toweragent.sh file is created, submit it to Slurm by running
sbatch run_toweragent.sh
Add a Compute Environment
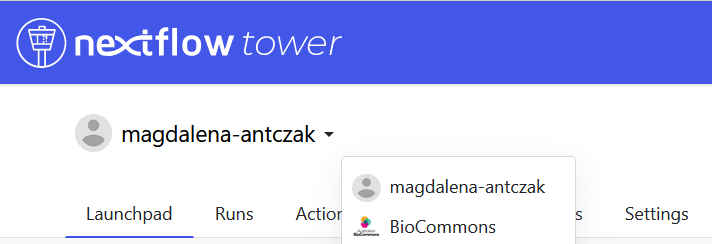
You are now ready to create a Compute Environment. Some general tips and instructions on how to add compute environments can be found in the Australian BioCommons documentation and in the Seqera help pages. Below are instructions on what to fill in the specific fields to run the ONTvisc pipeline on Gadi and Setonix. You can create a compute environment in your personal or organisational workspace. To do that, click on your user name in the top left corner of the page, select the corresponding workspace and then navigate to the Compute Environments tab.
Name
Provide a name according to the given instructions.
Platform
Gadi
Altair PBS Pro
Setonix
Slurm Workload Manager
Credentials
Gadi and Setonix
Select the Tower Agent credentials you created in one of the previous steps.
Work directory
Gadi and Setonix
Specify a directory where all the task work directories will be created (more information on the work directory in the Nextflow documentation and Nextflow basic training). This can be overwritten later when the pipeline is created and executed.
Launch directory
Gadi and Setonix
After the pipeline is launched from the Nextflow Tower, a script submission to the scheduler will be created and submitted on your behalf on the HPC. The Launch directory will store all those scripts, configuration files and logs. You can specify it or leave it empty (it will be populated with Work directory in the latter case).
Head queue name
Gadi
copyq
Setonix
work
Compute queue name
Gadi
Leave empty.
Setonix
work
Staging options: Pre-run script
Gadi
module load nextflow/22.04.3
module load singularity
Setonix
module load nextflow/23.04.3
module load singularity/3.11.4-slurm
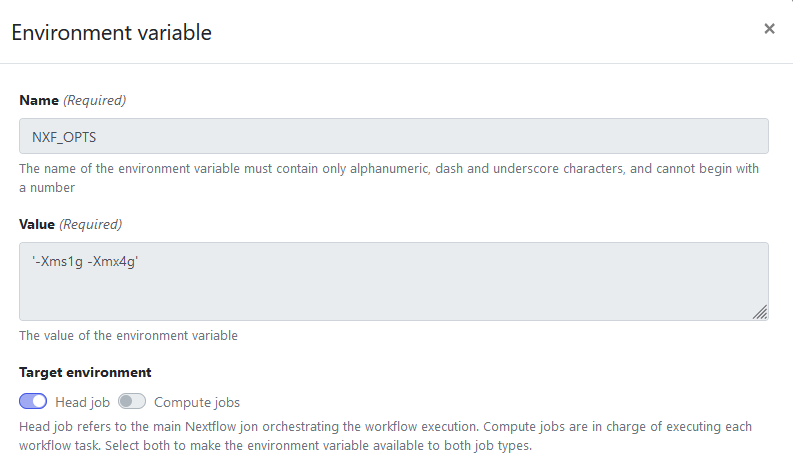
Environment variables
Gadi and Setonix
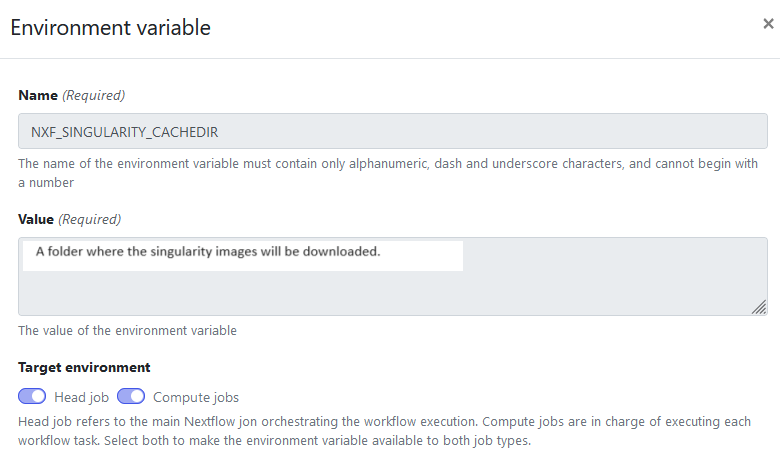
Add the environment variables like in the screenshots below.
Advanced options: Head job submit options
Gadi
Copy and paste the following text. Replace the
-l walltime=10:00:00,ncpus=1,mem=32gb,storage=scratch/<project-id>+gdata/<project-id>,wd -P <project-id>
If you are a part of the if89 project and want to use its databases, you need to link that location as well via -l storage directive, i.e.
-l walltime=10:00:00,ncpus=1,mem=32gb,storage=scratch/<project-id>+gdata/<project-id>+gdata/if89,wd -P <project-id>
Setonix
--mem=32G --cpus-per-task=8 --time=24:00:00
out of memory error when downloading the singularity images of the tools.Add a pipeline
Some general tips and instructions on how to add a pipeline can be found in the Seqera help pages. Below are instructions on what to fill in the specific fields to run the ONTvisc pipeline on Gadi and Setonix. Similarly to compute environments, you can add a workflow in your personal or organisation workspace. Just click on your user name in the top left corner of the page, select the corresponding workspace, but then navigate to the Launchpad tab.
Name
Provide a name according to the given instructions.
Compute environment
Select the Compute Environment you just created.
Pipeline to launch
https://github.com/eresearchqut/ontvisc
Revision number
Choose main or any other revision you want to execute.
Work directory
It should be pre-populated from the Compute Environment.
Config profiles
Select singularity.
Advanced options: Nextflow config file
Gadi
process {
   beforeScript = 'module load singularity'
   storage = 'scratch/<project-id>+gdata/<project-id>'
}
If you are a part of the if89 project and want to use its databases, you need to link that location as well:
storage = 'scratch/<project-id>+gdata/<project-id>+gdata/if89'
Setonix
process {
   beforeScript = 'module load singularity/3.11.4-slurm'
}
singularity {
    cacheDir = '<A FOLDER WHERE THE SINGULARITY IMAGES WILL BE DOWNLOADED>'
}
Advanced options: Pre-run script
It should be pre-populated from the Compute Environment.
Check if required databases are provided on your HPC
Tools in the ONTvisc pipeline compare the reads/clusters/contigs (depending on the mode) to a database or a reference. The explanation of which databases are required to be provided depending on the selected mode and tips on how to install them can be found in the pipeline’s wiki page in the Installing the required indexes and references section. Below are instructions for finding the required databases depending on the HPC.
Gadi
If access to Gadi was granted to you through the ABLeS initiative, you have access to the Australian BioCommons shared repository of tools and software, in project allocation if89. However, you need to join the if89 first. Check the folder /g/data/if89/data_library for your needed databases. If they are not provided there, contact the ABLeS team first to see if they can add it to the shared folder. If not, proceed with the installation yourself (below).
Setonix
Check if the databases you require are available in the folder /scratch/references (more details in the Reference datasets section of the Pawsey Filesystems and their Usage document). If they are not provided there, contact Pawsey helpdesk first to see if they can add it to the shared folder. If not, proceed with the installation yourself (below).
Lyra
Check with the eResearch team if Lyra has a shared repository of references. If not, proceed with the installation yourself (below).
Download databases if they are not provided
BLAST nucleotide sequence database (NT)
The following command will create a script download_blastdb.sh that downloads a perl script update_blastdb.pl, which will download and decompress all the necessary latest components of the NT database.
cat <<EOF > download_blastdb.sh
#!/bin/bash -l
<DIRECTIVES SPECIFIC TO THE SCHEDULER ON YOUR HPC>

cd <FULL PATH TO WHERE YOUR DATABASE WILL BE STORED>
curl -sO ftp://ftp.ncbi.nlm.nih.gov/blast/temp/update_blastdb.pl
chmod +x update_blastdb.pl
perl update_blastdb.pl --decompress nt
perl update_blastdb.pl taxdb
tar -xzf taxdb.tar.gz
EOF
After creating the script download_blastdb.sh, submit it to the scheduler. The command will depend on the scheduler the HPC uses - refer to the section below to find the appropriate command.
Gadi
Directives specific to PBS on Gadi
#PBS -N d_blastdb
#PBS -l mem=60gb
#PBS -l walltime=08:00:00
#PBS -q copyq
Command to submit the script to PBS
qsub download_blastdb.sh
Setonix
Directives specific to Slurm on Setonix
#SBATCH --job-name=d_blastdb
#SBATCH --mem=60gb
#SBATCH --time=08:00:00
Command to submit the script to Slurm
sbatch download_blastdb.sh
Lyra
Directives specific to PBS on Lyra
#PBS -N d_blastdb
#PBS -l mem=60gb
#PBS -l walltime=08:00:00
Command to submit the script to PBS
qsub download_blastdb.sh
Kraken
The following command will create a script download_kraken.sh which will download and decompress the Kraken2-compatile pre-built index PlusPFP (version from 10/09/2023) that contains Refeq archaea, bacteria, viral, plasmid, human, UniVec_Core plus Refeq protozoa, fungi & plant.
cat <<EOF > download_kraken.sh
#!/bin/bash -l
<DIRECTIVES SPECIFIC TO THE SCHEDULER ON YOUR HPC>

cd <FULL PATH TO WHERE YOUR DATABASE WILL BE STORED>
wget https://genome-idx.s3.amazonaws.com/kraken/k2_pluspf_20231009.tar.gz
mkdir -p k2_pluspf_20231009
tar -zxvf k2_pluspf_20231009.tar.gz -C  k2_pluspf_20231009
EOF
After creating the script download_kraken.sh, submit it to the scheduler. The command will depend on the scheduler the HPC uses - refer to the section below to find the appropriate command.
Gadi
Directives specific to PBS on Gadi
#PBS -N d_kraken
#PBS -l mem=60gb
#PBS -l walltime=08:00:00
#PBS -q copyq
Command to submit the script to PBS
qsub download_kraken.sh
Setonix
Directives specific to Slurm on Setonix
#SBATCH --job-name=d_kraken
#SBATCH --mem=60gb
#SBATCH --time=08:00:00
Command to submit the script to Slurm
sbatch download_kraken.sh
Lyra
Directives specific to PBS on Lyra
#PBS -N d_kraken
#PBS -l mem=60gb
#PBS -l walltime=08:00:00
Command to submit the script to PBS
qsub download_kraken.sh
Kaiju
The following command will create a script download_kaiju.sh which will download and decompress the Kaiju-compatible pre-built index for protein sequences from [the Reference Viral Databases (RVDB-prot)]https://rvdb-prot.pasteur.fr/) v26.0 database.
cat <<EOF > download_kaiju.sh
#!/bin/bash -l
<DIRECTIVES SPECIFIC TO THE SCHEDULER ON YOUR HPC>

cd <FULL PATH TO WHERE YOUR DATABASE WILL BE STORED>
wget https://kaiju-idx.s3.eu-central-1.amazonaws.com/2023/kaiju_db_rvdb_2023-05-26.tgz
tar -zxvf kaiju_db_rvdb_2023-05-26.tgz
EOF
After creating the script download_kaiju.sh, submit it to the scheduler. The command will depend on the scheduler the HPC uses - refer to the section below to find the appropriate command.
Gadi
Directives specific to PBS on Gadi
#PBS -N d_kaiju
#PBS -l mem=60gb
#PBS -l walltime=08:00:00
#PBS -q copyq
Command to submit the script to PBS
qsub download_kaiju.sh
Setonix
Directives specific to Slurm on Setonix
#SBATCH --job-name=d_kaiju
#SBATCH --mem=60gb
#SBATCH --time=08:00:00
Command to submit the script to Slurm
sbatch download_kaiju.sh
Lyra
Directives specific to PBS on Lyra
#PBS -N d_kaiju
#PBS -l mem=60gb
#PBS -l walltime=08:00:00
Command to submit the script to PBS
qsub download_kaiju.sh
VirDB
VirDB is a database created by the QUT eResearch team by merging GenBank, RefSeq and NCBI virus sequences and collapsing those with 99% similarity.
The following command will create a script, download_virdb.sh, which will download and decompress this collection of viral sequences.
cat <<EOF > download_virdb.sh
#!/bin/bash -l
<DIRECTIVES SPECIFIC TO THE SCHEDULER ON YOUR HPC>

cd <FULL PATH TO WHERE YOUR DATABASE WILL BE STORED>
https://zenodo.org/records/10183620/files/VirDB_20230913.tar.gz
tar -zxvf VirDB_20230913.tar.gz
EOF
After creating the script download_virdb.sh, submit it to the scheduler. The command will depend on the scheduler the HPC uses - refer to the section below to find the appropriate command.
Gadi
Directives specific to PBS on Gadi
#PBS -N d_virdb
#PBS -l mem=60gb
#PBS -l walltime=08:00:00
#PBS -q copyq
Command to submit the script to PBS
qsub download_virdb.sh
Setonix
Directives specific to Slurm on Setonix
#SBATCH --job-name=d_virdb
#SBATCH --mem=60gb
#SBATCH --time=08:00:00
Command to submit the script to Slurm
sbatch download_virdb.sh
Lyra
Directives specific to PBS on Lyra
#PBS -N d_virdb
#PBS -l mem=60gb
#PBS -l walltime=08:00:00
Command to submit the script to PBS
qsub download_virdb.sh